MongoDB驱动
这个扩展为Yii2框架提供了MongoDB的集成,允许你通过ActiveRecord风格的模型使用MongoDB collection的记录。
准备
- 按照官方指南http://www.yiiframework.com/doc-2.0/guide-start-installation.html的描述,使用Composer包管理器创建一个新的应用。
- 从https://docs.mongodb.org/manual/installation/使用正确的安装过程为你的系统安装MongoDB。
- 安装
php5-mongoPHP扩展 - 使用如下命令安装组件:
composer require yiisoft/yii2-mongodb
如何做...
- 首先,创建新的MongoDB数据库。在
mongo-clientshell中运行它,并输入数据库的名称:
mongo
> use mydatabase
- 添加连接信息到你的
components配置部分:
return [
    // ...
    'components' => [
        // ...
        'mongodb' => [
            'class' => '\yii\mongodb\Connection',
            'dsn' => 'mongodb://localhost:27017/mydatabase',
        ],
    ],
];
- 添加新的控制台控制器到你的控制台配置文件中:
return [
    // ...
    'controllerMap' => [
        'mongodb-migrate' => 'yii\mongodb\console\controllers\MigrateController'
    ],
];
- 使用shell命令创建新的migration:
php yii mongodb-migrate/create create_customer_collection
- 输入如下代码到
up()和down()方法中:
<?php
use yii\mongodb\Migration;
class m160201_102003_create_customer_collection extends Migration
{
    public function up()
    {
        $this->createCollection('customer');
    }
    public function down()
    {
        $this->dropCollection('customer');
    }
}
- 应用migration:
php yii mongodb-migrate/up
- 添加MongoDB调试板,以及模型生成器到你的配置中:
<?php
if (YII_ENV_DEV) {
    // configuration adjustments for 'dev' environment
    $config['bootstrap'][] = 'debug';
    $config['modules']['debug'] = [
        'class' => 'yii\debug\Module',
        'panels' => [
            'mongodb' => [
                'class' => 'yii\mongodb\debug\MongoDbPanel',
            ],
        ],
    ];
    $config['bootstrap'][] = 'gii';
    $config['modules']['gii'] = [
        'class' => 'yii\gii\Module',
        'generators' => [
            'mongoDbModel' => [
                'class' => 'yii\mongodb\gii\model\Generator'
            ]
        ],
    ];
}
- 运行Gii生成器:
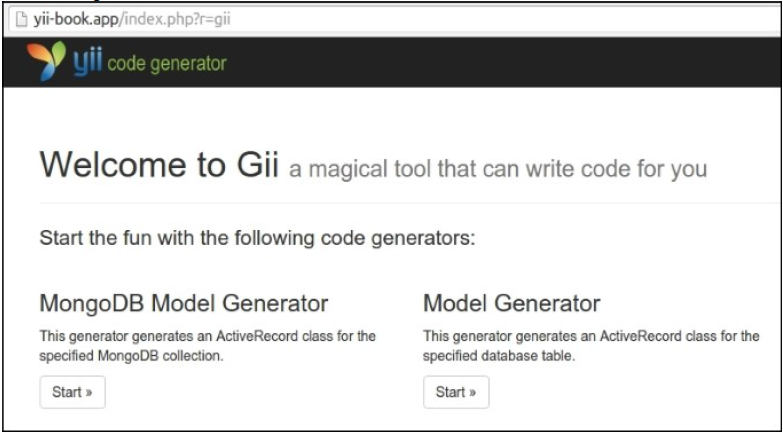
- 启动新的
MongoDB Model Generator来为你的collection生成新的模型:
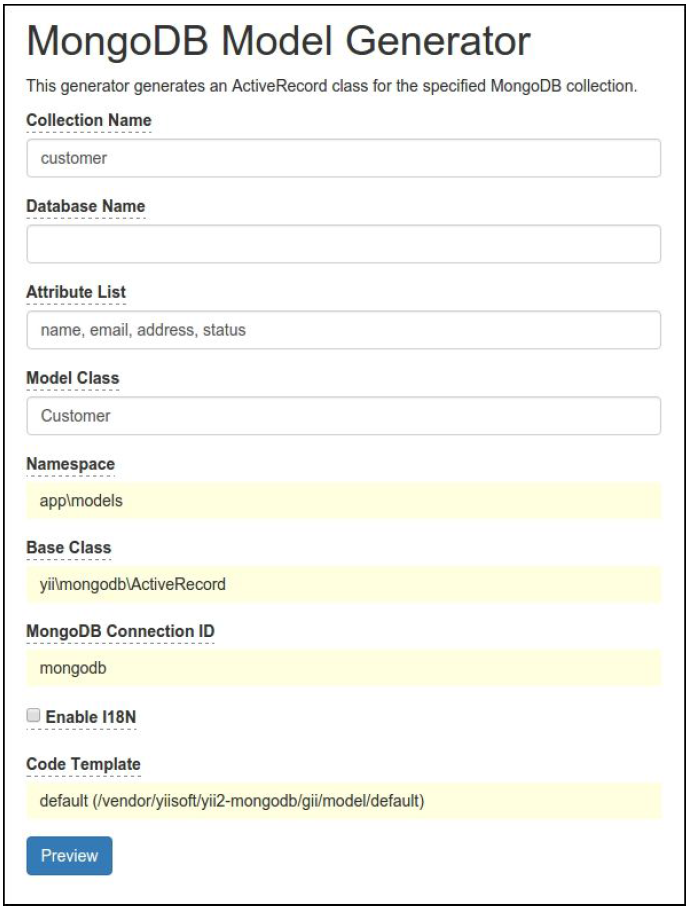
- 点击预览和生成按钮
- 检查你是否有了新的模型
app\models\Customer:
<?php
namespace app\models;
use Yii;
use yii\mongodb\ActiveRecord;
/**
 * This is the model class for collection "customer".
 *
 * @property \MongoId|string $_id
 * @property mixed $name
 * @property mixed $email
 * @property mixed $address
 * @property mixed $status
 */
class Customer extends ActiveRecord
{
    public static function collectionName()
    {
        return 'customer';
    }
    public function attributes()
    {
        return [
            '_id',
            'name',
            'email',
            'address',
            'status',
        ];
    }
    public function rules()
    {
        return [
            [['name', 'email', 'address', 'status'], 'safe']
        ];
    }
    public function attributeLabels()
    {
        return [
            '_id' => 'ID',
            'name' => 'Name',
            'email' => 'Email',
            'address' => 'Address',
            'status' => 'Status',
        ];
    }
}
- 再次运行Gii,并生成CRUD:
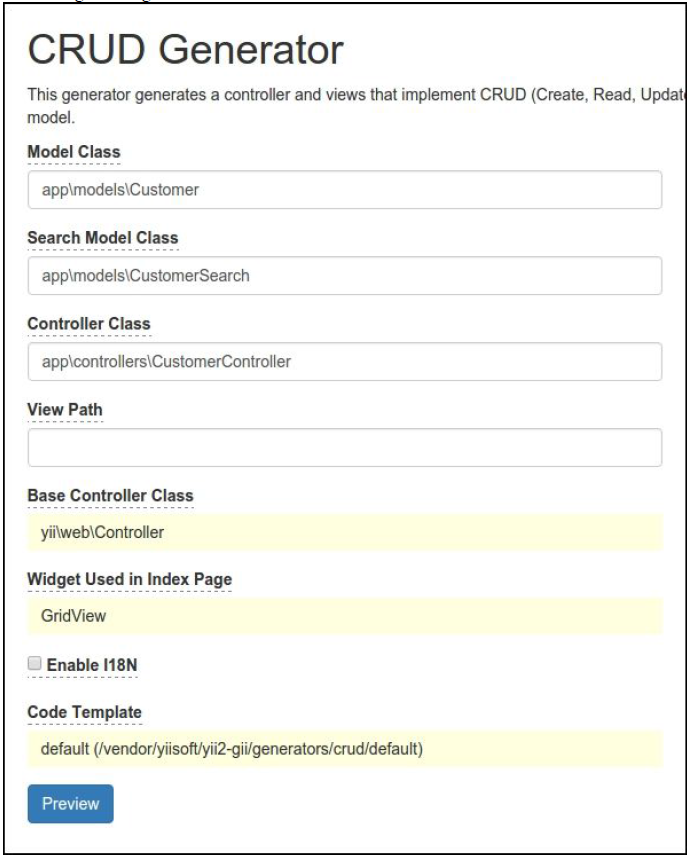
- 检查你已经生成了
CustomerController类,并运行新的customer管理页面:
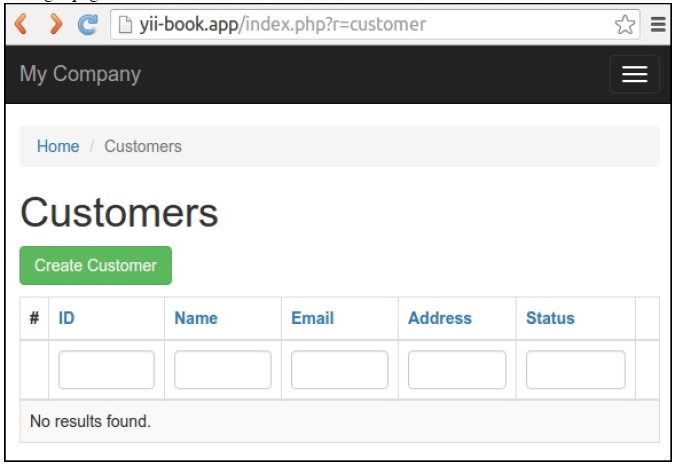
- 你可以创建、更新和删除你的顾客数据。
- 在页面的底部查看调试板:

- 你可以看到整个MongoDB查询数以及完整的执行时间。点击计数badge和查询指示:
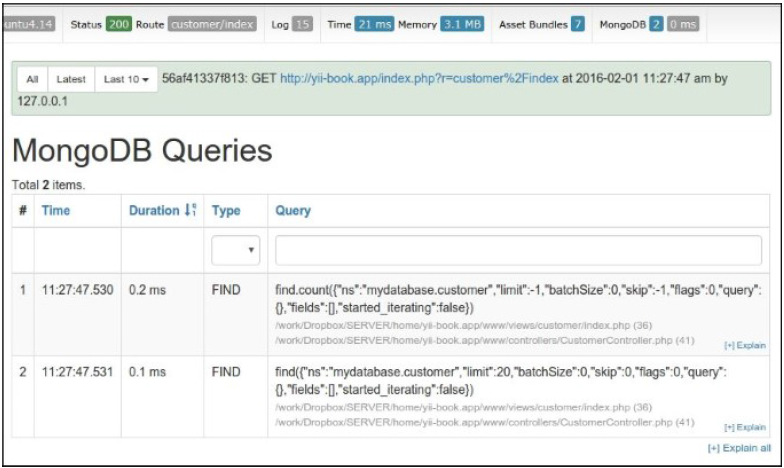
基本用法
你可以通过\yii\mongodb\Collection实例访问数据库和集合:
$collection = Yii::$app->mongodb->getCollection('customer');
$collection->insert(['name' => 'John Smith', 'status' => 1]);
为了执行find查询,你应该使用\yii\mongodb\Query:
use yii\mongodb\Query;
$query = new Query;
// compose the query
$query->select(['name', 'status'])
    ->from('customer')
    ->limit(10);
// execute the query
$rows = $query->all();
注意:MongoDB文档id(“_id”字段)不是数量,是一个\MongoId类的实例。你不需要关心从整形或者字符串$id转换为\MongoId,因为查询创建会自动转换:
$query = new \yii\mongodb\Query;
$row = $query->from('item')
    ->where(['_id' => $id]) // implicit typecast to \MongoId
    ->one();
为了获取真实的Mongo ID字符串,你应该将\MongoId做类型转为字符串:
$query = new Query;
$row = $query->from('customer')->one();
var_dump($row['_id']); // outputs:
"object(MongoId)"var_dump((string)$row['_id']);
工作原理...
这个扩展的Query、ActiveQuery以及ActiveRecord继承了yii\db\QueryInterface和yii\db\BaseActiveRecord。因此他们和框架内置的Query、ActiveQuery以及ActiveRecord是兼容的。
你可以为你的模型使用yii\mongodb\ActiveRecord,yii\mongodb\ActiveQuery构建器来获取你的模型,并在你的data provider使用他们:
use yii\data\ActiveDataProvider;
use app\models\Customer;
$provider = new ActiveDataProvider([
    'query' => Customer::find(),
    'pagination' => [
        'pageSize' => 10,
    ]
]);
关于如何使用Yii ActiveRecord的一般信息,请参考第三章,ActiveRecord,模型和数据库。
参考
- 欲了解更多关于该扩展的信息,请参考如下地址:
- 关于原始库的信息,参考
- 关于ActiveRecord的信息参考第三章,ActiveRecord,模型和数据库