部署工具
如果你为你的项目代码在使用一个版本控制系统,例如Git,将发布包推到远程库,你可以使用Git中的git pull命令来部署代码到你的生产服务器上,而不用手动上传文件。此外,你可以给自己写一个shell脚本来拉取新的库提交,更新vendors,应用migration等等。
但是,有很多工具可以用来做自动化部署。在本小节中,我们来看一些名叫Deployer的工具。
准备
按照官方指南http://www.yiiframework.com/doc-2.0/guide-start-installation.html的描述,使用Composer包管理器创建一个新的yii2-app-basic应用。
如何做...
如果你有一个共享的远程库,你可以使用它用来部署源。
第一步:准备远程host
- 到你的远程host,安装Composer以及
asset-plugin:
global require 'fxp/composer-asset-plugin:~1.1.1'
- 使用
ssh-kengen生成SSH秘钥。 - 添加
~/.ssh/id_rsa.pub文件内容到你的库设置页面中(部署SSH秘钥页面),例如Github、Bitbucket或者其它库存储。 - 尝试游动克隆的库:
git clone git@github.com:user/repo.git
- 添加Github地址,以及已知的host列表(如果你的系统问你要的话)。
第二步:准备localhost
- 在本地全局安装
deploy.phar:
sudo wget http://deployer.org/deployer.phar
sudo mv deployer.phar /usr/local/bin/dep
sudo chmod +x /usr/local/bin/dep
- 使用部署配置添加
deploy.php文件:
<?php
require 'recipe/yii2-app-basic.php';
set('shared_files', [
    'config/db.php',
    'config/params.php',
    'web/index.php',
    'yii',
]);
server('prod', 'site.com', 22) // SSH access to remote server
->user('user')
// ->password(password) // uncomment for authentication by
password
// ->identityFile() // uncomment for authentication by SSH key
->stage('production')
    ->env('deploy_path', '/var/www/project');
set('repository', 'git@github.com:user/repo.git');
- 尝试准备远程项目目录结构:
dep deploy:prepare prod
第三步:添加远程配置
- 打开服务器的
/var/www/project目录。初始化后它有两个子目录:
project
├── releases
└── shared
- 在
shared文件中创建带有私有配置的原始文件:
project
    ├── releases
    └── shared
        ├── config
        │   ├── db.php
        │   └── params.php
        ├── web
        │   └── index.php
        └── yii
Deployer工具将会在每一个发布的子目录中通过软连接的方式包含这些文件:
在share/config/db.php文件中指定你的私有配置:
<?php
return [
    'class' => 'yii\db\Connection',
    'dsn' => 'mysql:host=localhost;dbname=catalog',
    'username' => 'root',
    'password' => 'root',
    'charset' => 'utf8',
];
此外,在share/config/params.php中指定它:
<?php
return [
    'adminEmail' => 'admin@example.com',
];
设置文件share/web/index.php的内容:
<?php
defined('YII_DEBUG') or define('YII_DEBUG', false);
defined('YII_ENV') or define('YII_ENV', 'prod');
$dir = dirname($_SERVER['SCRIPT_FILENAME']);
require($dir . '/../vendor/autoload.php');
require($dir . '/../vendor/yiisoft/yii2/Yii.php');
$config = require($dir . '/../config/web.php');
(new yii\web\Application($config))->run();
此外,设置share/yii文件的内容:
#!/usr/bin/env php
<?php
defined('YII_DEBUG') or define('YII_DEBUG', false);
defined('YII_ENV') or define('YII_ENV', 'prod');
$dir = dirname($_SERVER['SCRIPT_FILENAME']);
require($dir . '/vendor/autoload.php');
require($dir . '/vendor/yiisoft/yii2/Yii.php');
$config = require($dir. '/config/console.php');
$application = new yii\console\Application($config);
$exitCode = $application->run();
exit($exitCode);
注意:我们故意使用dirname($_SERVER['SCRIPT_FILENAME']),而不是原始的__DIR__常量,因为如果这个文件时软连接的话,__DIR__将会返回不正确的值。
注意:如果你使用yii2-app-advanced模板,你可以只重定义config/main-local.php和config/params-local.php文件(backend、frontend、console和common),因为web/index.php和yii将会自动通过init命令生成。
第四步:尝试部署
- 回到本地,使用
deploy.php文件,并运行部署命令:
dep deploy prod
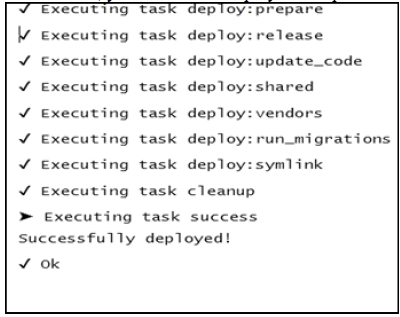
- 如果成功,你将会看到部署报告:
- Deployer在你的远程服务器上,创建一个新的发布子目录,并从你的项目到共享的items,以及从
current目录到当前发布添加软连接:
project
├── current -> releases/20160412140556
├── releases
│   └── 20160412140556
│       ├── ...
│       ├── runtime -> /../../shared/runtime
│       ├── web
│       ├── vendor
│       ├── ...
│       └── yii -> /../../shared/yii
└── shared
    ├── config
    │   ├── db.php
    │   └── params.php
    ├── runtime
    ├── web
    │   └── index.php
    └── yii
- 所有这些完成以后,你必须在
project/current/web目录中设置你的服务器DocumentRoot。 - 如果在部署过程中,发生了一些错误,你可以回滚到先前的发布上:
dep rollback prod
current目录将会定向到你先前的发布文件上。
工作原理...
大部分的部署工具都做了同样的任务:
- 创建一个新的发布子目录
- 克隆库文件
- 从项目中制作软连接到共享的目录上,以及到本地配置文件上
- 安装Composer包
- 应用项目migration
- 从服务器的
DocumentRoot路径上切换软链接到当前发布目录上
Deployer工具为流行的框架都做了预定义。你可以扩展任何已有的例子,或者为你的特殊的例子制作新的。
参考
- 欲了解更多关于Deployer的信息,参考http://deployer.org/docs
- 关于创建SHH秘钥的信息,参考https://git-scm.com/book/en/v2/Git-on-the-Server-Generating-Your-SSH-Public-Key